

page_banner

7 Best Floor Polishing Pads for Concrete Floors?

Concrete floors rarely fail because of the concrete alone. The wrong Floor Polishing Pads can leave uneven gloss, swirl marks, exposed aggregate, or heat-darkened patches.

Market evidence explains the growing interest. MarketsandMarkets estimated the global concrete floor coatings market at approximately USD 1.3 billion in 2023. Its report projects growth to about USD 1.8 billion by 2028. Grand View Research also identifies polished concrete as a steadily expanding flooring segment, supported by commercial, industrial, and residential renovation demand.

That growth creates a practical problem. More pad choices do not always mean better results.

A 50-grit metal-bond diamond pad may remove surface scratches effectively. It can also cut too aggressively on soft concrete. Resin pads usually refine the surface after grinding, while burnishing pads create the final sheen. Moisture, aggregate hardness, machine weight, and cleaning technique all change the outcome.

Small details matter.

For example, a warehouse floor may need aggressive cutting and dust control. A retail showroom may require finer polishing and a consistent reflection under bright lighting. The Concrete Polishing Association of America emphasizes testing the slab before selecting a polishing system. That advice is easy to ignore, yet it often prevents expensive rework.

This guide compares seven widely used Floor Polishing Pads for concrete floors. It considers cutting speed, finish quality, durability, compatibility, and practical operating conditions. Product rankings are never absolute. I have found that a pad performing well on dense gray concrete may disappoint on softer, decorative aggregate.

That uncertainty deserves attention. The best choice depends on the floor, not only the label.
7 Best Floor Polishing Pads for Concrete Floors?

How Concrete Floor Polishing Pads Work

7 Best Floor Polishing Pads for Concrete Floors?

How Concrete Floor Polishing Pads Work

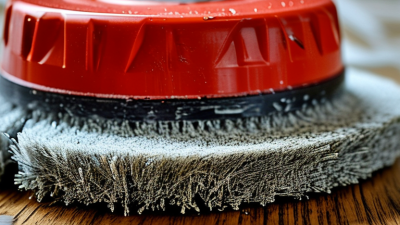
Concrete polishing pads remove surface paste through controlled abrasion. Metal-bonded diamonds cut aggressively, exposing harder aggregate beneath the surface. Resin-bonded pads then refine those scratches through progressively finer grits. A 50-grit pad may leave visible lines, while 800-grit or higher can create a sharper reflection. The correct sequence depends on cement hardness, aggregate type, moisture, and machine pressure.

Water cools the tooling and captures dust during wet polishing. Dry polishing uses a vacuum system and requires careful dust control. OSHA’s respirable crystalline silica standard sets an action level of 25 micrograms per cubic meter and an eight-hour exposure limit of 50 micrograms. That figure makes vacuum performance more than a housekeeping detail. It is a worker-protection requirement. Pad speed also matters; excessive RPM can glaze resin diamonds instead of improving the finish.

The U.S. Environmental Protection Agency estimated 600 million tons of construction and demolition debris in the United States during 2018. Longer-lasting pads can reduce replacement waste, but only when operators match the bond to the floor. Softer concrete usually needs a harder-bond pad. Hard concrete often cuts better with a softer bond. I have seen crews blame the pad after skipping a test area. That mistake is understandable, but expensive. Inspect the floor after every grit, especially near repaired cracks and exposed aggregate.

Seven Leading Pad Types for Different Concrete Finishes

Choosing the right polishing pad depends on the concrete finish, surface hardness, and desired sheen. Seven leading pad types cover most project needs.

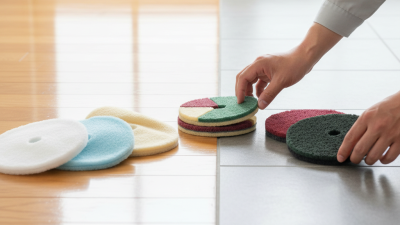
Metal-bond diamond pads remove coatings, lippage, and deep scratches during aggressive grinding. Hybrid or transitional pads refine those marks before polishing begins. Resin-bond diamond pads create a smoother surface and can develop a satin or high-gloss appearance. Ceramic-bond pads work well on dense concrete, where resin pads may glaze too quickly.

Electroplated diamond pads suit edges, corners, and small repair areas. Their exposed diamonds cut quickly, but they can leave a sharper scratch pattern. Burnishing pads improve gloss on already polished floors, especially in busy corridors. Impregnated diamond maintenance pads provide lighter daily polishing without removing much material. They are useful for keeping a finish even between deeper service visits.

Pad selection should follow a test area, not just a product chart. Check the floor after each grit, using clear lighting and a clean surface. A dark, hard slab may need slower passes and more water control. A softer slab can show swirl marks if pressure is too high. I have seen attractive gloss hide uneven scratch removal. That result looked finished, but it was not truly refined. Operators should also inspect pad wear often, because a worn edge can change the finish across one room.

How to Compare Grit, Bond, Material, and Durability

7 Best Floor Polishing Pads for Concrete Floors?

Choosing among seven concrete floor polishing pads starts with the surface, not the package label. Grit controls cutting speed and scratch depth. Coarse grits remove paint haze, lippage, and rough trowel marks. Fine grits refine the surface and increase clarity. A practical sequence may begin around 30 or 50 grit, then move through 100, 200, 400, 800, 1500, and 3000 grit. Test a small area first. Concrete hardness varies across one room.

Bond is equally important.

A hard bond can cut soft, sandy concrete without loading quickly. A softer bond usually works better on dense, polished concrete. If the pad leaves dark smears, the bond may be too soft or the floor may be damp. Material also changes handling. Diamond-resin pads offer controlled refinement, while metal-bond tools remove heavier defects more aggressively. Hybrid pads can bridge both stages, but their performance is not always predictable.

Durability depends on pressure, water, speed, and operator technique.

Excess pressure may shorten pad life and create uneven bands near wall edges. Keep the machine moving. Rinse pads after wet work and inspect their edges for glazing or exposed backing. I once blamed a weak pad for slow cutting, then found clogged pores and insufficient cleaning. That mistake matters. A useful comparison records square footage, finish quality, heat, and replacement time—not just purchase price.

A Step-by-Step Guide to Choosing the Right Polishing Pad

Choosing among the seven best floor polishing pads for concrete starts with the floor, not the product label. Check hardness, aggregate exposure, scratches, moisture, and traffic levels. A soft concrete floor may shed dust under an aggressive metal-bond diamond pad. A hard floor can make a resin pad feel useless. I learned this the expensive way: one coarse pass exposed uneven aggregate and created extra repair work.

Use this practical sequence. Select metal-bond diamond pads for heavy grinding and deep scratches. Move to hybrid pads when the surface needs smoother refinement. Choose resin-bond pads in 50, 100, 200, and 400 grit for progressive polishing. Use finer resin pads for higher gloss, but do not chase shine before removing visible marks. A burnishing pad suits routine maintenance, not major correction. Finally, use a dense cleaning or maintenance pad for light traffic areas.

Safety must guide every selection. OSHA’s respirable crystalline silica standard limits exposure to 50 micrograms per cubic meter over an eight-hour shift. Wet methods or verified dust extraction are essential during dry grinding. ASTM C779 also identifies abrasion resistance as a measurable concrete performance factor, reminding contractors that surface strength affects pad wear. Test a small area first. The floor may respond differently than expected. Record speed, pressure, grit, and water use, then adjust one variable at a time. Fancy equipment cannot rescue a poor sequence.

7 Best Floor Polishing Pads for Concrete Floors

A practical grit progression for concrete floor preparation and polishing. Lower grit numbers remove coatings and surface imperfections more aggressively, while higher grit numbers create a finer, glossier finish.

Typical sequence: start with the lowest suitable grit, then move through progressively higher grits. Actual pad selection depends on concrete hardness, surface condition, coating thickness, and whether wet or dry polishing is used.

Safety Practices and Common Concrete Polishing Mistakes

Concrete polishing pads work safely only when the floor, machine, and operator are properly prepared. Diamond-impregnated pads usually progress from coarse metal-bond segments to finer resin-bond pads. Choose the pad by surface hardness, coating residue, and the finish required. Test a small area before treating the entire floor. It reveals weak concrete, hidden cracks, and unwanted scratches.

Wear eye protection, hearing protection, gloves, and suitable respiratory protection during dry polishing. Use dust extraction with a sealed hose and check airflow before starting. Wet polishing controls airborne dust, but slurry can make the floor dangerously slippery. Keep electrical connections away from standing water. Mark the work zone clearly, and never leave rotating equipment unattended.

Many mistakes begin with rushing the grit sequence. A finer pad cannot always remove deep scratches from an earlier stage. Excessive pressure may generate heat, gouge soft concrete, or overload the machine. Move steadily instead. Clean the floor between stages, because loose diamond particles can create random marks. Operators sometimes polish around cracks and forget that movement may reopen them. I have found that visual checks under angled light expose defects missed under bright overhead lighting. The imperfect area may require returning to a coarser pad. Do not hide it with extra gloss.

7 Best Floor Polishing Pads for Concrete Floors: Safety Practices and Common Concrete Polishing Mistakes
Pad Type Typical Grit Range Best Use Recommended Stage Wet or Dry Operation Typical Speed Guidance Key Safety and Application Notes
1. Metal-Bond Diamond Pad 16–30 grit Removing coatings, laitance, paint residue, and significant surface irregularities Initial grinding Wet or dry, depending on the tool and dust-control system Follow the equipment and tooling rating; many floor grinders operate approximately between 400 and 1,200 rpm Use local exhaust ventilation or suitable wet suppression for airborne dust. Confirm that the floor is structurally sound before aggressive grinding.
2. Hybrid or Transitional Diamond Pad 30–80 grit Removing metal-grinding scratches and preparing the surface for resin-bond abrasives Refinement Usually dry, with dust extraction; wet use may be permitted by the pad manufacturer Use a controlled, even travel speed rather than relying only on high machine speed Do not skip the transitional step when deep metal scratches remain. Inspect the floor under good lighting before moving to finer grits.
3. Resin-Bond Diamond Pad 50–100 grit Refining scratches and opening a more uniform concrete surface Early honing Wet or dry, subject to the pad design and dust-management plan Use the lowest effective speed that maintains consistent contact and avoids excessive heat Keep the machine moving to prevent uneven wear or localized heat. Remove slurry promptly when working wet.
4. Resin-Bond Diamond Pad 100–200 grit Producing a smoother, more consistent surface before densification Intermediate honing Wet or dry, with the correct dust or slurry controls Use overlapping passes and maintain a steady walking pace Check for pinholes, exposed aggregate, and remaining scratches. Do not apply densifier over a floor that still has visible deep scratches.
5. Fine Resin-Bond Diamond Pad 200–400 grit Creating a smooth, low-sheen surface and preparing for polishing Fine honing Wet or dry, according to the selected system Use consistent pressure; excessive pressure can reduce pad life and create uneven results Allow any densifier to react and dry according to its technical instructions. Remove residue before continuing to the next step.
6. High-Grain Polishing Pad 800–1,500 grit Developing a satin to semi-gloss appearance and improving stain resistance when combined with proper treatment Polishing Commonly dry with effective dust extraction; some systems permit wet polishing Use the pad within its rated rpm range and avoid forcing the machine Wear eye, hearing, and respiratory protection as appropriate. A polished floor can become slippery when contaminated by oil, water, or cleaning chemicals.
7. Ultra-Fine Burnishing Pad 1,500–3,000 grit or equivalent Enhancing clarity, gloss, and final appearance after the surface is already properly polished Final polishing Usually dry, with dust control and a clean floor surface High-speed burnishing may be used only with equipment and pads specifically rated for it Do not use this pad to remove deep scratches, coatings, or major unevenness. Clean abrasive dust between passes to prevent fine scratching.
Essential Safety Practices
Safety Area Recommended Practice Reason
Silica Dust Control Use wet methods or a properly designed dust-collection system. Keep the vacuum, hoses, and filters maintained. Concrete grinding can generate respirable crystalline silica, which can seriously damage the lungs.
Personal Protective Equipment Use safety glasses or a face shield, hearing protection, suitable respiratory protection, safety footwear, and gloves when appropriate. Grinding creates airborne particles, noise, flying debris, and rotating-equipment hazards.
Electrical Safety Inspect cords and connections, use ground-fault protection where required, and keep electrical components away from standing water. Wet polishing increases the risk of electric shock if equipment is not suitable and protected.
Machine Operation Check pad attachment, confirm the machine's rpm rating, start with controlled passes, and keep bystanders away. Incorrect attachment or excessive speed can cause pad failure, loss of control, or surface damage.
Work Area Control Remove trip hazards, mark wet areas, protect nearby walls and equipment, and provide adequate lighting and ventilation. A clean, controlled work area reduces slips, trips, collisions, and visibility-related mistakes.
Common Concrete Polishing Mistakes to Avoid
Common Mistake What Happens Better Approach
Starting with an unsuitable grit Fine pads are overloaded, while aggressive pads may create unnecessarily deep scratches. Evaluate the coating, hardness, flatness, and scratch depth before selecting the starting grit.
Skipping grit steps Previous scratches remain visible after polishing and may become more difficult to remove later. Use a logical grit progression and verify the surface after each stage.
Moving the machine too quickly The floor receives inconsistent abrasion, resulting in visible bands, swirls, or uneven gloss. Use slow, overlapping passes with consistent machine pressure and travel speed.
Using excessive pressure Pads wear prematurely, machines become harder to control, and the floor may develop uneven marks. Let the abrasive do the work; increase pressure only when the equipment and pad system allow it.
Ignoring concrete hardness A pad may cut too slowly on hard concrete or wear too quickly on soft, sandy concrete. Test a small area and adjust the abrasive bond, grit, speed, and pressure to the concrete condition.
Polishing over contamination Oil, dirt, slurry, and abrasive residue can clog pads and reduce surface uniformity. Clean the floor regularly and use fresh water or an appropriate vacuum system during the process.
Expecting polishing to correct major defects Deep cracks, unstable concrete, severe lippage, and structural problems remain visible or worsen. Repair suitable defects first and obtain a professional assessment when structural movement or extensive damage is present.
Important: Grit numbering, pad composition, recommended rpm, and wet-or-dry compatibility can vary between tooling systems. Always follow the pad and machine manufacturer's technical instructions, and test a small inconspicuous area before treating the entire floor.